Grinding Your Own HSS Lathe Tool Bits: Angles That Cut Clean
A new apprentice grinds a lathe tool that looks perfect — sharp, symmetrical, shiny — and it rubs, squeals, and leaves a torn finish. An old hand grinds one that looks rough and it peels a clean ribbon of swarf on the first pass. The difference is invisible from across the bench: it's the angles . A lathe tool doesn't cut because it's sharp; it cuts because its clearance and rake angles are right for the work. Learn the handful of angles and what each one does, and grinding your own HSS bits becomes one of the most useful — and cheapest — skills in the shop.
This guide is for the machinist or apprentice grinding HSS (high-speed steel) lathe tool bits by hand on a bench grinder. We'll cover the angles and the job each does, how they change for steel, brass and aluminium, and the technique that grinds them without ruining the steel.
The angles, and what each one does
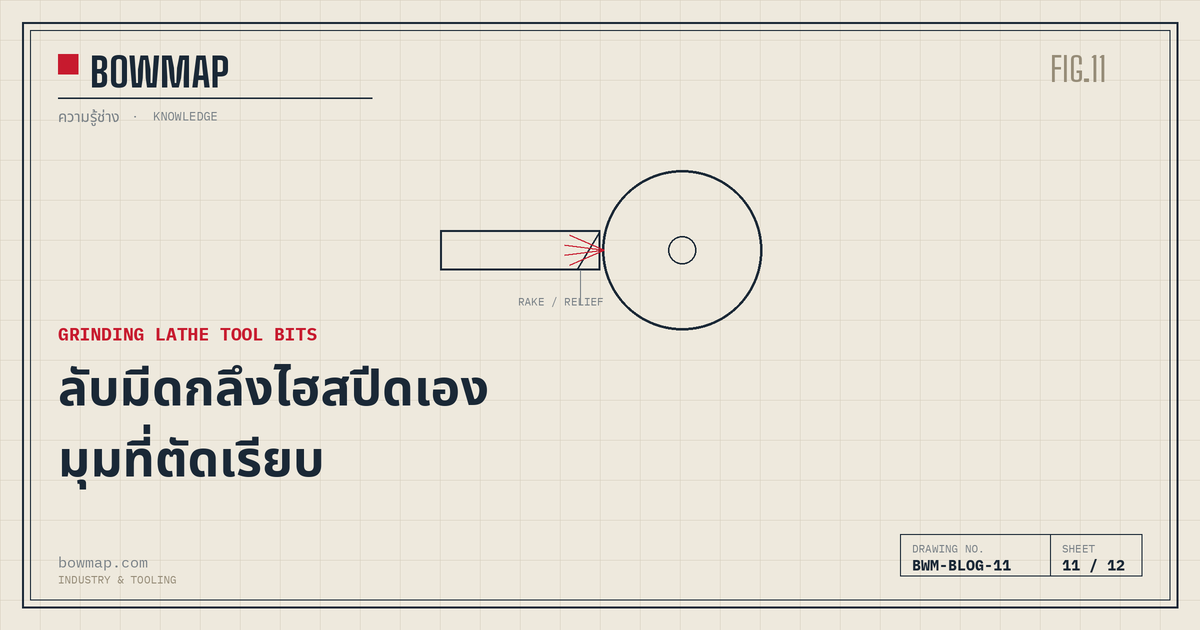
Every general turning tool has the same set of ground surfaces. Each has one job, and getting any of them wrong shows up immediately in the cut.
| angles | Where | What it does |
|---|---|---|
| Side relief (clearance) | Below the side cutting edge | Stops the flank rubbing the work; ~6–10° |
| Front/end relief | Below the end cutting edge | Lets the nose clear as it feeds; ~8–12° |
| Back rake | Top face, sloping back | Curls the chip up and back, eases cutting; positive for steel |
| Side rake | Top face, sloping sideways | Directs chip flow and reduces cutting force; ~10–14° for steel |
| Nose radius | The tip | Small radius for finish and tip strength; sharp point is weak |
The two that beginners get wrong are clearance tooth and a rake . Too little clearance and the tool rubs instead of cuts — it squeals, work-hardens the surface, and burnishes rather than peels. Too much clearance and the edge is weak and chips. Rake controls how freely the chip forms: positive rake (top sloping away from the edge) cuts with less force and suits steel and aluminium; zero or negative rake is stronger and used where the material would otherwise grab.
How the angles change with material
The same tool shape doesn't suit every metal. Rake especially changes with what you're cutting.
| Material | rake | Why |
|---|---|---|
| Mild / general steel | Moderate positive back & side rake (~8–14°) | Cuts freely, curls a clean chip, manages cutting force |
| Aluminium | High positive rake | Soft and gummy — a keen, high-rake edge slices cleanly and won't build up |
| Brass / bronze | Zero or slightly negative rake | A positive edge "grabs" and digs into brass; a flat/negative top is safe and smooth |
Clearance angles stay roughly the same across materials; it's mainly the rake you change. The classic mistake is turning brass with a steel-ground positive-rake tool — the tool snatches into the work and can climb or dig in. Grind a separate near-zero-rake tool for brass, keep a high-rake one for aluminium, and a moderate-positive one for steel. A set of HSS lathe tool bits in cobalt grades gives you blanks tough enough to grind for each material and re-grind many times.
Grinding technique without ruining the steel
HSS keeps its hardness to a high temperature, but you can still overheat the thin edge and lose the temper there — and once an edge is overheated it won't hold up no matter how sharp you make it.
- Dress the wheel first. A clean, true, sharp grinding wheel cuts cool and fast; a glazed wheel rubs and overheats the tool. Dress it before grinding tool bits. A cup or bench grinding wheel kept dressed is the foundation of a good edge.
- Grind in light passes and keep it cool. Don't lean on the tool. Take light passes and, for HSS, dip it in water frequently to keep it cool enough to hold — if the edge turns dark blue you've overheated it; grind that back. (Some shops grind HSS without quenching to avoid micro-cracks, but either way the rule is don't let the edge get blue-hot)
- Grind the surfaces in order: side and front clearance first, then the top rake faces, checking the angles against a gauge or by eye as you go. Keep each face flat and the cutting edge straight.
- Hone the edge. Finish with a few strokes on an oilstone to remove the grinding burr and leave a keen, polished cutting edge — a honed HSS edge cuts cleaner and lasts noticeably longer than one straight off the wheel.
When you need speed, hardness, or a long production run rather than a hand-ground bit, a brazed carbide turning tool takes over — but for everyday manual turning, learning to grind HSS to the right angles gives you a perfectly matched tool for any material in a couple of minutes, for almost nothing.
BOWMAP Industry & Tooling, a Samut Prakan supplier of Japanese-quality industrial tools, stocks HSS and cobalt tool-bit blanks, carbide turning tools and dressed grinding wheels, so a workshop can grind clean-cutting tools for every material and keep them sharp.
FAQ
Q1. What angles does an HSS lathe tool need for cutting steel? Roughly: side relief (clearance) 6–10°, front/end relief 8–12°, and positive back and side rake around 8–14°, with a small nose radius for finish and strength. The clearance angles stop the tool rubbing; the positive rake lets it cut steel with less force and curl a clean chip. Honing the edge afterwards makes it cut cleaner.
Q2. Why does my freshly ground tool rub instead of cut? Almost always too little clearance (relief) below the cutting edge, so the flank of the tool drags on the work instead of letting the edge bite. It squeals, burnishes, and work-hardens the surface. Grind a bit more relief under the cutting edges — a sharp tool with no clearance still won't cut.
Q3. Why does my tool dig in when turning brass? Because it's ground with positive rake for steel, and brass "grabs" a positive-rake edge and pulls it into the work. Grind a separate tool with zero or slightly negative top rake for brass and bronze; the flatter top stops the tool snatching and gives a smooth, controlled cut.
Q4. Will grinding overheat and ruin an HSS tool bit? It can if you force it. HSS holds hardness to high temperature, but leaning hard on a glazed wheel overheats the thin edge and softens it — if it turns dark blue, that edge is spoiled and must be ground back. Dress the wheel, take light passes, keep the tool cool, and the steel stays good.